Switches in Stompboxes
There are almost as many types of mechanical switches in the world as there are idiots. Well, maybe not. But switches to come in a bewildering array of sizes, types, and functions. Fear not: there are a only few key types used in stompboxes to concentrate on. Here is a very basic tutorial.
(For some more switch related pages, see True Bypass Loops)

Types of Switch Actions
- Momentary: Press the switch and it makes contact. As soon as you let up, a spring pushes the switch back into open mode
- Slide: You turn the switch on or off by sliding the plastic block thingy.
- Toggle: A metal or plastic shaft sticks out and you move it back and forth.
- Push On/Off: This is what the typical big make-it-go switch does. Push it once and it is on, push again and it is off
Other Switch Families
This article talks about mechanical switches--the kind you use your finger, foot, or some other type of physical thing to activate. There are other families of switches too. Electro-mechanical switches, also called relays, use an electrical current to turn on an off. Additionally, semiconductors such as transistors and integrated circuits can act as switches.
Poles and Throws
Switches are defined by poles and throws: The poles is number of switch contact sets. The throws are the number of conducting positions, which can be single or double. Switch types usually are abbreviated so a Single Pole Double Throw switch would be a SPDT.
Single Throw Switches
This is about the simplest switch--it makes or breaks a contacts between two lugs.
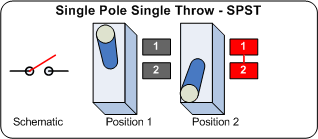
You would typically use this for a power switch.
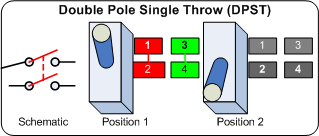
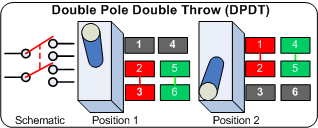
Dual Throw Switches
This is the most common family of the mechanical switches, dual throw means you are switching one or more lugs etween two positions.
Rotary Switches
Rotary switches are characterized by rotational actuation, instead of flipping a switch, you turn it.
These switches are great if you need to switch more than two values. For example, let's say your circuit has an input or tone-shaping capacitor, and instead of a single fixed value, you want to make it switch between a bunch of different caps, treble to bass. You would use a rotary switch here because it offers and easy way to switch to more combinations than the two offered by dual-throw toggle switches.
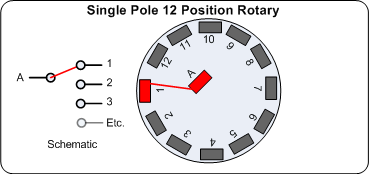
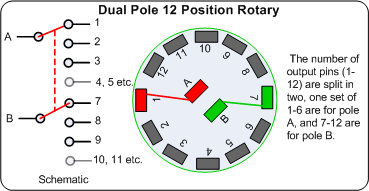
A couple of things to note with rotary switches. They come in two general configurations:
-
Non-Shorting - When you switch positions, the switch breaks the connection with the current position before engaging the next.
-
Shorting - When you switch positions, the switch leaves the current connection intact while switching to the new position, and then disconnects the current connect. This is good for circuits where a momentary open circuit would be bad (i.e. switching speakers or high load scenarios)
Another thing to think about on rotary switches: because the are mechanical devices that you stick a knob on, the knob is going to be subject to a lot more physical push than on a pot. So if you use set-screw knobs with a plastic-shaft rotary switch, you are likely going end up with a knob that slips. The solution to this is either to a metal-shaft rotary switch (which allows the set screw to bite into the shaft better) or to use a D-shaft or knurled shaft design.
Hacking with Switches
You can use switches to modify stompboxes in lots of interesting ways. Typically, you'll use switches to accomplish of two things: switching between different circuit paths/components and turning something on or off.
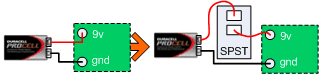
Break any circuit
You can splice a SPST switch into just about any connection/wire. For example, the following diagram would add a power switch by intercepting the + line from a battery to the board with a switch.
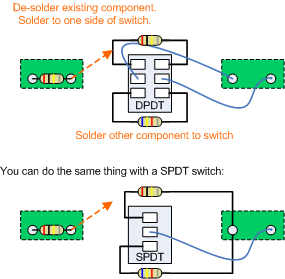
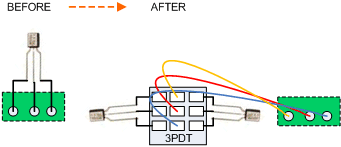
Switch between two different components
Very often, there are parts in a circuit you can change to mod the sound. For example, in the Tube Screamer overdrive circuit, you can reduce the value of the 4.7k ohm resistor to 2 ohms for more gain. So you could just de-solder the 4.7 and solder in the 2.2. But what if you wanted to be able to switch the pedal back to its original configuration, perhaps to compare the sounds, or perhaps you like both modes? A simple DPDT switch will accommodate this nicely. You can also use a SPDT switch as shown in the diagram.
Switch between two sets of components
Let's say your original circuit has two resistors. You want to switch between the original two and another set of different values. Unsolder one lead on each of the original resistors and re-solder them to one end of a DPDT switch. Solder the new values on to the same pad as the originals and solder their other ends to the other end of the switch. Finally, run the middle lugs of the switch back to the two pads you unsoldered the original resistors from.
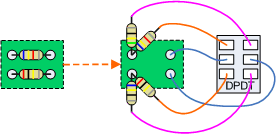
Switching Between Transistors
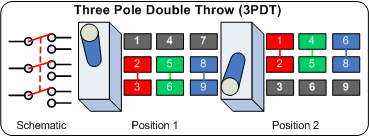
Often when modifying fuzz boxes, it is fun to switch between two types of transistors. For example, in the classic FuzzFace circuit, you may want to switch between the original germanium transistors and the newer silicon ones. You can use a 3PDT switch to accomplish this. Note that when you change transistors, you are most likely changing gain, so you'll also want to add a bias knob to the circuit so you can re-bias when switching transistors.
Roll your own Tone Stack
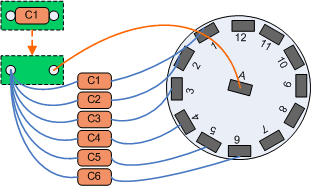
Capacitors are commonly used to control audio frequencies. Most pedals will likely have a cap or two that you can change to alter frequency. To make a complete set of tone-stack options, try multiple capacitor values with a rotary switch. The diagram shows the first six positions of a rotary switch wired with different capacitor values--you can use as many or as few as you like.
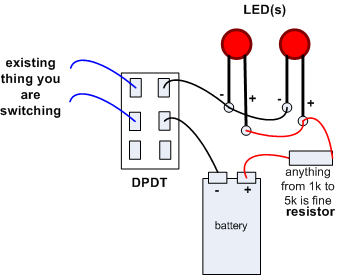
Adding a LED to a Switch
Let's say you use a switch to change a value. But you want that switch to be a stompswitch that has a LED status indicator. You can do this easily with a DPDT and a LED and a resistor. Power the LED with the pedal's existing power source and use the other side of the DPDT to connect/disconnect whatever you want.
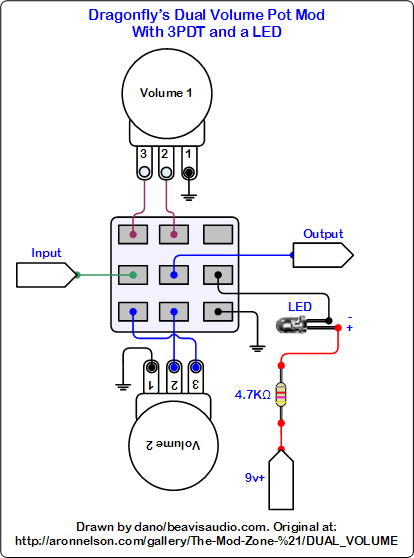
Creating a dual volume control
Let's say you have a stompbox with a volume control and you want to mod it to have to different preset volume levels controlled by a stompswitch. And you also want to add an LED indicator light. To do this, simply add another pot (we'll call it Volume 2), a 3PDT switch, a LED and a current limiting resistor, like this:
Wrapping Up
Mechanical switches are easy to understand and allow to add a great deal of flexibility to your circuits. Don't be afraid to experiment. And if you get a hold of some funky switch you just can't figure out, dont forget that your multimeter set to continuity is the quickest way to map out connections.

This work is licensed under a Creative Commons Attribution-NonCommercial-ShareAlike 4.0 International License.